
The Averted Vision Observatory is located in upstate New York near the foothills of the Adirondack Mountains.
I decided on a roll-off roof design since I wanted to have two (2) telescope piers and a separate control room (climate controlled). Originally the plan was for myself, with the help of a friend or two, to build the structure from the ground up. I purchased some plans from the good people at Backyard Observatories and looked to modify them a bit.
While reviewing the plans, it struck me that we might be able to get a decent portion of the actual construction already completed by purchasing a couple pre-made sheds (one for the equipment room and one for the control room). The thought was we could remove a wall on one and put them together into a single larger building. Then we could cut the roof off the equipment portion to put it on wheels, etc, and build the support structure for the roll-off portion. All that would leave would be dealing with adding some windows / doors where desired and cutting a couple of holes in the floor (for the piers) and re-framing where needed…
So, with that thought in mind we headed down to the local Amish shed supplier and started looking around. The owner came out to talk to us and we explained what we were looking to do…it was then that everything just kind of fell into place…he said we could just tell him what we wanted the end product to look like and they would simply build it that way! What a time saver! …and to be honest probably a money saver also, as the cost was much more reasonable than I expected and certainly prevent some headaches. They would even paint the exterior to match my house. So, we sketched everything out, including the different doors and windows, both on the interior and exterior…we also determined where the piers would come through the floor and they built openings for those as well! Needless to say I was VERY happy. I decided to go with a shingled non-movable roof over the control room, and a metal roof (to cut down on some weight and help with snow removal) for the roll-off portion. The roof for the roll-off portion was going to be supplied unattached with the understanding that I would still need to build the supports, etc. for that roof.
While awaiting the shed (I guess I could start calling it an “observatory” now) to be built and delivered, I had the concrete piers put in…they extend over four feet below grade with a “bell” on the bottom to help prevent any shifting and moving from the ground freezing during the winter. I also ran power, internet and cable from the house around the perimeter of my property to where the observatory would be placed. I had an electrician lined up to put a sub panel in and get the main power connected when the building arrived. I also had a local construction company willing to give the roll-off roof structure and assembly a try (they had never done anything like it before, but I knew and trusted them). In approximately a month’s time I got the word that they were ready to deliver the building! Needless to say I was very excited…I knew I still had a bunch of work to do to finish the interior and get everything ready to go once it was here, but I was looking forward to the challenge.
Here is a brief picture tour of how everything worked out…You can click on any of the pictures below for a larger view of any image.
 |
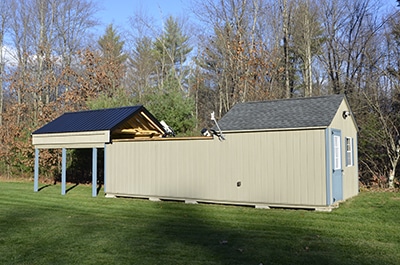
This is the front of the observatory as it was delivered. This door opens to the control room which is 12′ x 12′. I added the window to provide some light when desired and I thought it also added to the aesthetics of the building…as you will see in the finished pictures below, I added blackout shades to both the door and window to block any outside light when needed. |
| Here is a shot from the back side…I opted for double doors here to make it easier to move larger pieces of equipment in and out of the equipment room as necessary. The equipment room is 12′ x 16′. |  |
 |
The inside of the control room facing the equipment room. I had a nice size window installed to keep an eye on the equipment while controlling things from the computer. On the floor are parts of the roll off portion of the roof that still needs to be constructed. This door goes from the control room to the equipment room. |
| As seen from the outside in the first picture, this is the entry door and window to the control room from the outside. Obviously all of the wiring and finishing still needs to be done. I ended up adding insulation to the walls and ceiling, and put tongue & groove pine over it for added protection. I figured since I would be heating and cooling this room the insulation would be a big plus! See below for the finished pictures. |  |
 |
The inside of the equipment room as you walk through the door from the control room. They did a great job with the cutouts in the floor for the cement piers to come through…spacing worked out perfectly between the cutouts and they were able to set the structure down over the piers without a problem. Notice that they even left a “lip” on the framing where the cutouts are placed. They included the pieces of decking that were cut out so I could cut them to exactly fit the piers and leave minimal open area in the floor. |
| Looking back toward the control room from the double doors of the equipment room. All of the roof framing and the end piece were included pre-assembled and ready to go. To finish the walls in the equipment room I simply installed perf board once the wiring was done as seen below in the completed pictures. |  |
 |
The constructed roll off roof and support structure. The way the contractor assembled it allows it to close over the top of the fixed roof of the control room with some overlap…this helps keep any rain or snow out. Attempting to seal any gaps has proved to be a challenge…the best answer to date has been to use brush seals in most cases. |
| This is the motor that opens and closed the roof…it was purchased from Backyard Observatories. The motor has proved to be very effective at moving the large, heavy roof. There were limit switches included which are set to stop the roof just as it seals against the stationary roof when closed and just before the end of the track when opened. |  |
 |
Here is a picture of the v-groove wheels and inverted angle iron that the roof moves along…so far this system has been working well and I expect it should continue to do so for years to come. |
| Telescopes installed with the mounts sitting atop two Pier Tech piers. The primary mount is a Losmandy G-11 sitting on a Pier Tech II which can be raised and lowered to provide maximum sky visibility. The secondary mount is a Celestron AVX which is on a Pier Tech I fixed height pier. |  |
 |
The completed exterior with all remaining painting done so everything matches well with the main house. Also shown is the Moon Glow Technologies All Sky Cam (as seen on the Sky Data / Charts page) and Unihedron Sky Quality meter installed on the side of the observatory. |
| Peek-a-boo…the scopes peeking out above the wall with the roof open. |  |
 |
Next are a few shots of the completed equipment room as it currently exists. Plenty of shelving is installed along the far wall to hold the abundance of cases and miscellaneous gear. The flooring is interlocking dense foam tiles that provide a little cushioning on the feet and for anything that may get dropped. |
| A view from the other end showing a little more shelving (left side) with a special shelf just for the beautiful Wood Wonders eyepiece case. The monitor seen on the right side of the picture is a duplicate of the screen from the main computer in the control room. |  |
 |
One more shot looking past the telescopes and through the window into the control room. Near the top left of the window is one of the two IP cameras used to monitor the observatory remotely and for security purposes. |
| Here is the finished control room. I went with a laminated wood flooring here which was easy to install and I feel looks good with the pine on the walls and ceiling. The corner desk fits in perfectly and is positioned well to watch the action in the equipment room when operating everything via the computer. The air conditioner is really nice to have during the warm summer months! |  |
 |
Plenty of books and magazines to read on the bookshelf and a space heater for the cold winter months. With the insulation in the walls it easily keeps things nice and toasty inside even when it’s really cold outside. |
| The final picture…yes, I do have cable run out to the observatory for the TV. Internet is handled via fiber optics run from the main house also which has provided a rock solid and fast connection. The futon is comfortable when guests are over and lays out flat in case I need to take a nap. |  |
Thanks for taking a look! As you can tell from the pictures, I’m surrounded by quite a few trees which, unfortunately, limit my views (mainly to the east and the west). Fortunately, I have a good view of Polaris to the north (so I can align the scopes) and a decent span of the ecliptic visible (toward the south) for lunar, solar and planetary work. I also have the luxury of having a very good spot close by for remote observing and imaging when needed. That spot has a much more wide open view and some pretty decently dark skies!